Follow my handy guide to growing your own crop of tomatoes this year

Month By Month Chart:

If you are a beginner to growing your own food, then tomatoes are great one to start with as they are fairly easy to maintain. They don't need too much care and attention other than watering, and the occasional pinching out of side shoots to keep the plant producing good fruits. The best thing about tomatoes is that they can be grown in the smallest of spaces, they can be planted out in the garden, grown in pots or grow bags, or they also do well growing in greenhouses or conservatories.
There are however a number of things that you need to do to produce good crops. Tomatoes grow best when they are exposed to full sunlight, in a sheltered position. They need nutrient rich, peat free soil and and some varieties will need canes or frames for support as they grow and produce heavy fruits. Tomatoes need a lot of watering especially during the drier sunnier months. If tomato plants are exposed to erratic watering this will stress the plant and cause the production of thick and broken skin on the fruits.
Getting Started - Growing tomatoes from seed
If you refer to the chart above, it provides a guide on sowing, planting and harvesting times. This information is also found on the back of seed packets and may vary depending on the variety you have. Generally sowing starts in late January / early February, however to keep a good crop rotation for the year you can sow seeds up to the end of April.
Sow your seeds in small pots of compost, add around 4-5 seeds per pot because once they have all germinated you will select the strongest plants to transfer to individual pots to grow on. Cover the seeds with a thin layer of compost, or for best results you can top with vermiculite instead of compost. Vermiculite is a mineral rich compound that can absorb three or four times its weight in water and also attracts various plant nutrients such as potassium, magnesium and calcium. It also helps to aerate the soil and prevent mold/fungal growth.

Young tomato seedlings
Once the seeds have been sown, cover the pot with cling film or place in a propagator and keep in a sunny position indoors - I put mine on a south facing window sill and leave them alone. Germination, or the time it takes for a seedling to appear will be around 7-14 days. When seedlings appear take off the cling film or remove the lid from the propagator. When the plants reach about 2-3cm tall, prick out the strongest plants from each pot being very careful to not damage the root and transfer one plant into is very own 5cm pot, filled with moist multi-purpose compost. Once you have done this with all your best seedlings, return them to the windowsill. Keep potting on as necessary making sure that you support the stems by tying them to a pea stick with soft string.
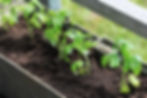
Stronger seedlings being grown on
As the plants grow bigger you can transfer them outside to grow on in raised beds, large pots or in grow bags. They will now need to be supported by something a bit more sturdy such as canes or wooden frames. Be aware that you should only put your plants outside after the last frost in May. If it is a particularly cold year, it is best to acclimatise your plants slowly by putting them outside during the day and bringing them inside at night, do this for about a week. You can of course keep your plants growing indoors or in a greenhouse.
Pinching out tomatoes
Tall-growing cordon tomatoes will produce side shoots that will need "pinching out" or removing. When the first tiny fruits begin to appear, strip away the leaves underneath to allow light and air to reach them better. When there are four trusses (clusters) of flowers, pinch out the plant’s growing tip as pictures below.
Bush tomato plants do not need to have their side shoots pinched out and you can pretty much leave them to get on with it. If the fruits are hidden under the leaves, thin out the foliage a little to let the sun through to ripen them. Support heavy trusses on top of upturned flowerpots to prevent their stems snapping.

Photo credit: Gardeners World - Pinching out side shoots
General care and maintenance
When I first started growing tomatoes I used grow bags as they were really easy to use. Now I have specially designed planters that have supporting frames for the plants to grow around and this has worked perfectly. Once your plants are in their final growing position either outside, indoors or in a greenhouse, keep any eye on the soil and make sure it doesn't get too dry, or too wet and soggy. Once the flowers begin to appear start feeding your tomatoes weekly with a liquid tomato plant food.
Whitefly can be a problem for tomatoes especially during warmer and drier summers. Keep an eye on your plants and at the first sign of whitefly use an eco friendly bug spray or mix a small amount of washing up liquid in some water to spray on to the plant. You will need to keep on top of this because if whitefly multiplies too much they will destroy the plant. Another great way to get rid of whitefly is by introducing ladybirds to the plants as a natural sustainable form of pest control.
The tomato plant growers worst nightmare is blight and this can be a real problem in damper summer months, it is a fungal problem and only survives on living crops, it loves humid and damp places and it can also effect potatoes.
Early blight can be stopped if treated appropriately, but this would mean that you would have to use a fungicide, there are chemical based ones available and these are unfortunately the most effective. BUT if you are like me and want to remain an organic grower you can use neem oil and copper sulphate to prevent further infection. Once your plants have late blight it is pretty much game over, there are some things you can do but if it takes hold and starts to destroy your crops you you must get rid of them to reduce further spread.
There are a number of ways you can prevent your plants from getting blight. You can purchase blight resistant seeds and when watering plants don't wet the leaves, just water at the base, also consider growing the plants in raised beds making sure there is plenty of space around the plants for the air to get to them.

Late stage Tomato Blight
Blossom end rot, pictured below, occurs when there is a calcium deficiency in the soil, it can be a result of underfeeding with tomato feeder or erratic watering. When growing tomatoes, get in the habit of checking to see if they need watering every morning and every evening and maintain a weekly feeding routine once the first set of flowers appear.

Photo credit: Gardeners World - Blossom end rot
Harvesting and storing your tomatoes
It is always best to leave the tomatoes on the vine to ripen naturally in the sun as this really improves the flavour. Snip off any dying or crusty leaves to allow the sun to get to the fruit as much as possible and prevent any mold or pests from taking hold. If you have fruits still growing or ripening as the weather starts to cool, you can cut off the vines and continue to ripen them indoors on a sunny windowsill.
The best way to use tomatoes is straight from the vine after a warm day, however due to the versatility of tomatoes you can make soups, turn them into chutney or you can simply chop and freeze them for later use. Last year I had so many tomatoes that I sun-dried some, added them to jars and covered them with olive oil, herbs and garlic, to make my very own sun-dried tomatoes, which were delicious.
I hope that I have been able to inspire you to grow some tomatoes this year, if you start off simple you might find that you really enjoy it and then you can broaden your horizons into growing other foods.
I would very much love to hear about your own experiences of growing food so please do follow me on my social media platforms and tag me in on your posts.
Happy Growing